The plan was to
raise the shed to keep storage dry and increase the sheds' lifespan.
Total cost for the floor material in 2010 are: $250.00
[building it myself I saved over $1200.00 in labor].
You will need:
- 1 box of 1 1/2" coated deck screws (for the plywood floor)
- 1 box of 3" coated deck screws (for the framing)
- A Drill and drill bit half the thickness of the screw threads
- circular saw or crosscut handsaw
- clamp
- roofers square, T square or angle guide
- tube of construction adhesive and chalking gun
The 2009 model 10' x 8' Dakota shed kit was listed for $349.00 at the big box store. This shed sold for $299.99 at end of summer.


Note: The shed comes with a steel floor framing kit to support a plywood floor. The big box sample shown above was built over a skid but it's meant for direct contact with the soil.
I am building it on a 2x6 frame for heavy loads.
Materials
(2010 prices) with 2" x 6" joists for the frame
- 5 joists that are 10' long [$6.70 each] to run left to right.
- 3 joists that are 8' long [$4.57 each] using 2 of them on either side of the 10 footers and a 3rd piece to make 4 supports under the plywood seams.
- 3 sheets of "outdoor" grade 8' x 3/4" plywood [$40.00 each]
- 15 solid cement blocks 8" x 12" [$2 each] to raise the frame off the soil
- 6-10 bags of driveway stone to fill in the spaces between the brick yet allow air flow.
- Optional wire fence cloth to keep out critters.
Level the cement Blocks
Place 15 cement blocks spaced apart as an 8 foot square. The blocks are essential to keep the wood dry and allow air to circulate. You could lay the wood frame on the dirt, but even treated wood will decay sitting on wet soil.
Build the frame
Two 8' joists cover the ends of the five 10' joists as shown above.
Lay the 8' joists together and mark both boards at the same time. From one end measure 48" and mark a center line for one 10 foot center board to be attached. Then, make lines 24" out in both directions from the center mark for the last 4 joists boards.
Tip: Pre-drill the screw holes and use construction adhesive where any two pieces of wood are joined You may want to add deck framing metal hardware.
Optional Anchors ($50.00)
Another
expense to consider is installing Hurricane Anchors. This ties the shed floor to earth with 4 screw rods that go 2 feet
deep into the soil. Use a couple of cables to thread the rods together
over the joists under the plywood.
The shed walls will be screwed to the bottom track that you screw to the floor, tying everything together.
When driving the screw rods into the ground I point them inwards to make them work together and harder to pull straight up.

Update 2013: During New Jersey's Super storm Sandy on 10/29/2012 100mph winds stripped a cement jacket off my chimeny and speared a tree limb through the front wall of the house, but the anchors proved a success and no damage was done to the shed!
Make 2 cuts
The last plywood sheet I cut to make two 2x4' and one 4x4' sheets. I like to cut each piece off the opposite ends, to take advantage of the square factory edges. The middle 4x4' I can use later to cut into some shelving.
Block the ends at the joints
The last 8' joist I cut 4 pieces of 22 1/2" long to block under the plywood joints. Don't skip this step or the weight of your storage will bend the plywood and over time will create a permanent sag. You'll end up with a permanent trip hazzard.
Layout of the full sheets. You can also see the cable tie downs.
Building the shed
Use the plans supplied to screw the sill frame together.
(All the framing pieces are numbered)
Below is a closeup of the the front sill with door track (left) ready to connect to the side sill (right).

Attach the front sill to the front edge of the wood floor.
Add left, right and rear sills to the wood floor and measure diagonally corner to corner from the front to the rear and adjust the rear corners until exact then screw down to the floor.
My plan leaves 2" of extra floor behind the shed. Since the shed is almost a foot higher it helps as a step for future maintenance. But, I don't recommend leaving the extra step at the front because as you enter the shed you have to lean forward and get your head inside the 5' door before you actually step up and over the floor rail. More floor in front will just compound the problem.
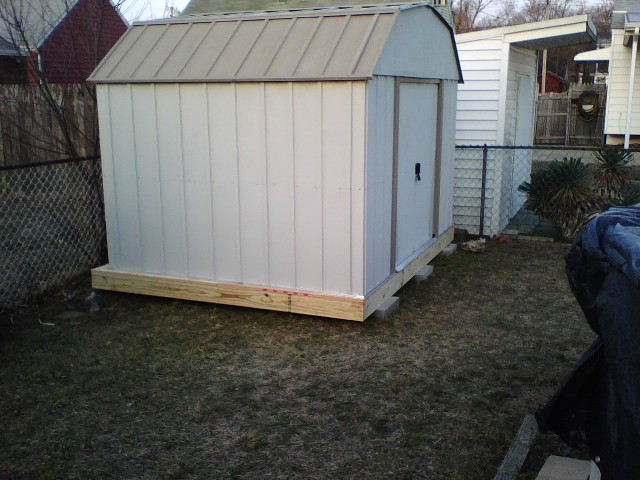
The final product. Happy building.
Kudos to Google Sketchup7, a Free drawing tool I used to make these drawings.